博主昨天把blog迁移到digitalocean啦~特地来个傻瓜式配置教程。
本文包括如下内容
- centos下安装wordpress过程
- 开启mod_rewrite模块
- 开启GZIP压缩网页
- 上传图片/文件失败解决办法
- YOAST SEO sitemap 404 解决办法
主机配置
centos 6.7 *32
5$ /m
- ps: 点击该链接注册可以获得10$ : digitalocean
新加坡结点
等一会儿就好了:

happy coding ^ ^
工具准备
使用windwos的童鞋需要准备如下工具之一,因为要用命令行的方式来操作服务器。为此,需要一个能支持SSH登录的软件。
- Xshell : SSH登录,推荐这个,界面漂亮。
- Xftp: SFTP传文件工具,和Xshell师出同门,推荐
- SSH Secure Shell Client 这个也有SSH 登录的功能,但对中文乱码。 它还有可视化的界面来传文件,类似FTP
- putty:很简洁的一个ssh工具
获取需要资源
打开你的SSH登录软件,连接到digitalocean上,(用户密码还有IP地址你建好一个服务器会发到你的邮箱:) )第一次进去要求修改密码。
修改完后,依次输入如下命令,获取资源,设置开机启动,启动服务
- yum -y install mysql-server httpd php php-mysql unzip wget
- chkconfig httpd on
- chkconfig mysqld on
- /etc/init.d/mysqld start
- /etc/init.d/httpd start
mysql 设置
登录mysql
- mysql -u root -p
创建root密码
- 这一步主要是为了安全起见~mysql默认root密码为空,这不安全
- SET PASSWORD FOR 'root'@'localhost' = PASSWORD('newpass');
创建数据库
- create database wordpress;
创建用户(把hrwhisper改成你的用户即可)
- create user hrwhisper@localhost;
设置密码
- set password for hrwhisper@localhost=password("123456");
设置权限(需要给这个新用户权限访问数据库)
- grant all privileges on wordpress.* to hrwhisper@localhost identified by '123456';
做完上面的步骤后
- FLUSH PRIVILEGES;
- exit;
wordpress获取和配置
获取
获取第一步我们已经yum 安装了 wget所以只要执行下面的命令就可以,这里假定当前终端目录为(当前用户的根目录)
- wget http://wordpress.org/latest.tar.gz
解压
- tar -xzvf latest.tar.gz
配置wordpress
创建wp-config.php文件
- cp ~/wordpress/wp-config-sample.php ~/wordpress/wp-config.php
编辑(如果没有vim那么yum install vim下)
- vim ~/wordpress/wp-config.php
这里简单介绍下vim使用:
- vim 用方向键控制u 撤销,i插入模式 保存esc然后输入:wq即可
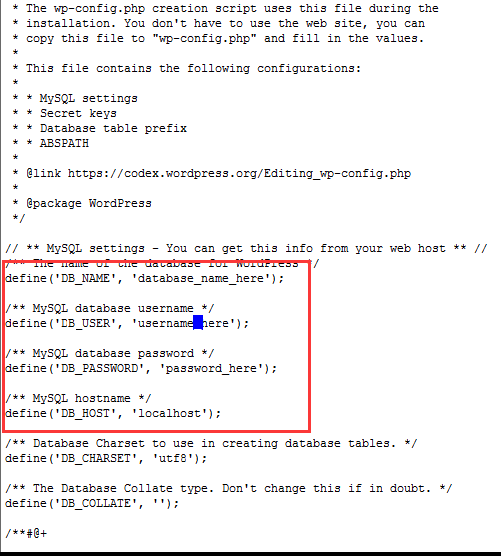
以博主刚才的为例:
- DB_NAME : wordpress
- DB_USER: hrwhisper
- DB_PASSWORD:123456
接下来
复制到 web 目录下
- mkdir -p /var/www/html (如果文件夹不存在)
- cp -r ~/wordpress/* /var/www/html
用浏览器访问试试
导入数据库
如果不是新站,而是原来的站点呢?那么需要进行数据库的导入。
将数据库上传到服务器。(博主用Xftp 协议用SFTP,不要用ftp,SFTP安全 )
登录数据库后,进行如下操作
选择数据库
- mysql>use abc;
设置数据库编码
- mysql>set names utf8;
导入数据(注意sql文件的路径)
- mysql>source /home/abc/abc.sql;
下面介绍博主配置好后使用中出现的问题和解决办法
开启mod_rewrite
如果你更改了wordpress固定链接,那么mod_rewrite是要开启的~不然就一片404啦
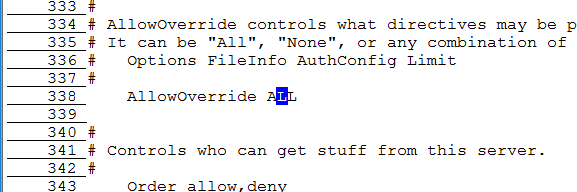
vim /etc/httpd/conf/httpd.conf
AllowOverride None 改为 AllowOverride All (在 <Directory "/var/www/html">里)
在/var/www/html/ 里编写.htaccess文件
重起服务器,终端中输入
- service httpd restart
博主这里是338行
参考: http://dev.antoinesolutions.com/apache-server/mod_rewrite
开启GZIP压缩网页
有两种方法,mod_gzip 和mod_deflate,用一个即可。
mod_gzip 和mod_deflate的主要区别
- 第一个区别是安装它们的Apache Web服务器版本的差异。Apache 1.x系列没有内建网页压缩技术,所以才去用额外的第三方mod_gzip 模块来执行压缩。而Apache 2.x官方在开发的时候,就把网页压缩考虑进去,内建了mod_deflate 这个模块,用以取代mod_gzip。虽然两者都是使用的Gzip压缩算法,它们的运作原理是类似的。
- 第二个区别是压缩质量。mod_deflate 压缩速度略快而mod_gzip 的压缩比略高。一般默认情况下,mod_gzip 会比mod_deflate 多出4%~6%的压缩量。
- 第三个区别是对服务器资源的占用。 一般来说mod_gzip 对服务器CPU的占用要高一些。mod_deflate 是专门为确保服务器的性能而使用的一个压缩模块,mod_deflate 需要较少的资源来压缩文件。这意味着在高流量的服务器,使用mod_deflate 可能会比mod_gzip 加载速度更快。
mod_deflate
推荐这种方法,把下面的内容写在 .htaccess中即可
1 | AddOutputFilterByType DEFLATE text/plain |
mod_gzip
需要自己开启mod_gzip模块,然后把下面的内容写在 .htaccess中即可
1 | <ifModule mod_gzip.c> |
GZIP测试工具
输入你的站点,然后看看是不是压缩了呢?
上传图片失败解决办法
不要相信网上一堆chmod 777的方法,虽然是可行的,但是不安全
正确的方法应该是修改文件所有者:
- chown -R apache /var/www/html/wp-content/uploads
当然你也可以把整个改成apache,这样你升级插件什么的也不会有问题
- chown -R apache /var/www/html/
如果提示的内容是missing a temporary folder
修改/etc/php.ini ,指定个临时目录
- upload_tmp_dir = /tmp/
重启服务器即可
- service httpd restart
YOAST SEO sitemap 404 解决办法
博主发现YOAST SEO 创建的sitemap访问直接 404。
修改 .htaccess file,把下面内容加在wordpress rewrite规则前面就可以啦
Yoast SEO - XML Sitemap Rewrite Fix
RewriteEngine On RewriteBase / RewriteRule ^sitemap_index.xml$ /index.php?sitemap=1 [L] RewriteRule ^locations.kml$ /index.php?sitemap=wpseo_local_kml [L] RewriteRule ^geo_sitemap.xml$ /index.php?sitemap=geo [L] RewriteRule ^([^/]+?)-sitemap([0-9]+)?.xml$ /index.php?sitemap=$1&sitemap_n=\(2 [L] RewriteRule ^([a-z]+)?-?sitemap.xsl\) /index.php?xsl=$1 [L] # END Yoast SEO - XML Sitemap Rewrite Fix
参考 http://kb.yoast.com/article/77-my-sitemap-index-is-giving-a-404-error-what-should-i-do
参考资料
How To Install Wordpress on Centos 6
Installing WordPress on CentOS 5/6