最近把服务器的架构从LAMP换成了LNMP(linux + nginx + mysql + php),顺便换了个服务器。下面把过程记录一下。
2017/7/17 更新 : centos 6.9 + nginx 1.12.1 + mysql 5.7 + php 7.1 apache 在低配置服务器下的优化 执行完,博客已经在LAMP稳定的运行了133天。
after-optimizing-apache
可以看出,优化还是比较成功的,那么这次为什么要改成LNMP呢?
原因是我感觉有时候浏览blog的时候速度很慢,但过一会儿又很快,感觉是apache阻塞式运行方式造成了并发不行。。。
现在换了LNMP后,没有感觉这些问题。
服务器系统为centos 6.
环境部分
Nginx
首先编辑源
vim /etc/yum.repos.d/nginx.repo
输入如下内容
1
2
3
4
5
[nginx] name=nginx repo baseurl=http://nginx.org/packages/centos/$releasever/$basearch/ gpgcheck=0 enabled=1
然后使用yum安装步骤如下
sudo yum install nginx
sudo /etc/init.d/nginx start
这时候可以通过IP地址访问你的站点看看是否是nginx呢?
忘记IP了?(如下命令打印出IP)
1 ifconfig eth0 grep inet awk '{ print $2 }'
接下来进行配置,打开 sudo vi /etc/nginx/nginx.conf
PHP安装和配置
新版安装
yum默认的版本太老了,装5.6配置一下源:
1
2
3
4
5
6
7
CentOS/RHEL 7.x: rpm -Uvh https://dl.fedoraproject.org/pub/epel/epel-release-latest-7.noarch.rpm rpm -Uvh https://mirror.webtatic.com/yum/el7/webtatic-release.rpm CentOS/RHEL 6.x: rpm -Uvh https://dl.fedoraproject.org/pub/epel/epel-release-latest-6.noarch.rpm rpm -Uvh https://mirror.webtatic.com/yum/el6/latest.rpm
然后安装php7
yum install php71w php71w-fpm php71w-mysql
如果要安装php5.6
yum install php56w php56w-fpm php56w-mysql
旧版安装
系统默认的比较老,可以直接:
sudo yum install php-fpm php-mysql
配置
[...] ; Unix user/group of processes ; Note: The user is mandatory. If the group is not set, the default user's group ; will be used. ; RPM: apache Choosed to be able to access some dir as httpd user = nginx ; RPM: Keep a group allowed to write in log dir. group = nginx [...]
重启php-fpm
sudo service php-fpm restart
PHP-FPM优化
由于是小的内存,只有512MB,除开启虚拟内存外,我对php-fpm也进行了优化。
sudo vi /etc/php-fpm.d/www.conf
1
2
3
4
pm.max_children = 20 pm.start_servers = 5 pm.min_spare_servers = 1 pm.max_spare_servers = 5
Mysql
Mysql5.7新版安装
要安装新版本可以先去https://dev.mysql.com/downloads/repo/yum/ 找到系统对应源的地址
比如我的:
1 wget https://dev.mysql.com/get/mysql57-community-release-el6-11.noarch.rpm
然后安装
1
2
3
sudo yum localinstall mysql57-community-release-el6-11.noarch.rpm sudo yum -y install mysql-community-server sudo service mysqld start
Mysql5.7默认 root 安装了 validate_password 插件,这个插件要求必须使用强密码,生成的 root 密码在 /var/log/mysqld.log,查看:
cat /var/log/mysqld.log grep password
然后
sudo /usr/bin/mysql_secure_installation
输入密码后,修改密码(要求强密码,最好字母大小写、数字、特殊字符),然后一路按y
旧版安装
系统yum里面的为5.1版本,安装直接如下:
sudo yum -y install mysql-serversudo /etc/init.d/mysqld restart
打开设置向导,设置好密码后,一路yes
sudo /usr/bin/mysql_secure_installation
配置
登入mysql
创建数据库
create database wordpress;
创建用户把hrwhisper改成你的用户即可
create user hrwhisper@localhost;
设置密码
set password for hrwhisper@localhost=password("123456");
设置权限
grant select,insert,update,delete,create,index,references,alter on wordpress.* to hrwhisper@localhost identified by '123456';
做完上面的步骤后
恢复数据库
如果是旧的站点,可以将数据库导入,方法如下:
登录数据库后,进行如下操作
(1)选择数据库 mysql>use abc;
(2)设置数据库编码 mysql>set names utf8;
(3)导入数据(注意sql文件的路径) mysql>source /home/abc/abc.sql;
获取wordpress
和LAMP一样,
wget http://wordpress.org/latest.tar.gz
tar -xzvf latest.tar.gz
cp ~/wordpress/wp-config-sample.php ~/wordpress/wp-config.php
sudo vi ~/wordpress/wp-config.php
// ** MySQL settings - You can get this info from your web host ** // /** The name of the database for WordPress */ define('DB_NAME', 'wordpress');
/** MySQL database username */ define('DB_USER', 'wordpressuser');
/** MySQL database password */ define('DB_PASSWORD', 'password');
配置nginx路径
sudo vim /etc/nginx/conf.d/default.conf
这里列举修改的地方
在index那行中添加index.php
改变根目录为 /var/www/html;
把 "location ~ .php$ {", 的注释全部去掉
改变location ~下的root路径为/var/www/html;
修改fastcgi_param
可以参考如下:
1
2
3
4
5
6
7
8
9
10
11
12
13
14
15
16
17
18
19
20
21
22
23
24
25
26
27
28
29
30
31
32
33
34
35
36
37
38
39
40
41
42
43
44
45
46
47
48
49
50
51
52
53
# # The default server # server { listen 80; server_name _; #charset koi8-r; #access_log logs/host.access.log main; location / { root /var/www/html; index index.php index.html index.htm; } error_page 404 /404.html; location = /404.html { root /usr/share/nginx/html; } # redirect server error pages to the static page /50x.html # error_page 500 502 503 504 /50x.html; location = /50x.html { root /usr/share/nginx/html; } # proxy the PHP scripts to Apache listening on 127.0.0.1:80 # #location ~ \.php$ { # proxy_pass http://127.0.0.1; #} # pass the PHP scripts to FastCGI server listening on 127.0.0.1:9000 # location ~ \.php$ { root /var/www/html; fastcgi_pass 127.0.0.1:9000; fastcgi_index index.php; fastcgi_param SCRIPT_FILENAME $document_root$fastcgi_script_name; include fastcgi_params; } # deny access to .htaccess files, if Apache's document root # concurs with nginx's one # #location ~ /\.ht { # deny all; #} }
设置自启动
配置完上面的记得重启一下
1
2
3
sudo chkconfig --levels 235 mysqld on sudo chkconfig --levels 235 nginx on sudo chkconfig --levels 235 php-fpm on
到这里,基本配置已经结束,站点已经能正常访问。 下面是进阶的配置,如开启gzip、rewrite、https等
其他的配置
开启gzip
vim /etc/nginx/nginx.conf
1
2
3
4
5
6
7
8
9
10
11
12
13
14
15
16
gzip on; # 启用gzip压缩的最小文件,小于设置值的文件将不会压缩 gzip_min_length 1k; # gzip 压缩级别,1-10,数字越大压缩的越好,也越占用CPU时间,后面会有详细说明 gzip_comp_level 2; # 进行压缩的文件类型。javascript有多种形式。其中的值可以在 mime.types 文件中找到。 gzip_types text/plain application/javascript application/x-javascript text/css application/xml text/javascript application/x-httpd-php image/jpeg image/gif image/png; # 是否在http header中添加Vary: Accept-Encoding,建议开启 gzip_vary on; # 禁用IE 6 gzip gzip_disable "MSIE [1-6]\.";
开启rewrite
不开启rewrite wordpress修改固定链接是无法使用的
vim /etc/nginx/conf.d/default.conf
下面是一个完整的vhost的配置文件
1
2
3
4
5
6
7
8
9
10
11
12
13
14
15
16
17
location / { index index.html index.htm index.php; root /www/wwwroot/ccvita.com; if (-f $request_filename/index.html){ rewrite (.*) $1/index.html break; } if (-f $request_filename/index.php){ rewrite (.*) $1/index.php; } if (!-f $request_filename){ rewrite (.*) /index.php; } }
开启swap
参考:https://www.digitalocean.com/community/tutorials/how-to-add-swap-on-centos-6
开启https
我开启了强制HTTPS,所以 /etc/nginx/conf.d/default.conf 配置为
1
2
3
4
5
server { listen 80; server_name hrwhisper.me; return 301 https://www.hrwhisper.me$request_uri; }
接下来配置/etc/nginx/conf.d/ssl.conf,主要是把ssl 设为on,
然后设置ssl_certificate 和ssl_certificate_key为你证书的路径(注意不能直接拿apache的来用,那个有3个,直接用证书链不完整,电脑OK,但手机显示不受信任)
PS: 还没有证书?参考Centos 获取 Let’s Encrypt 证书
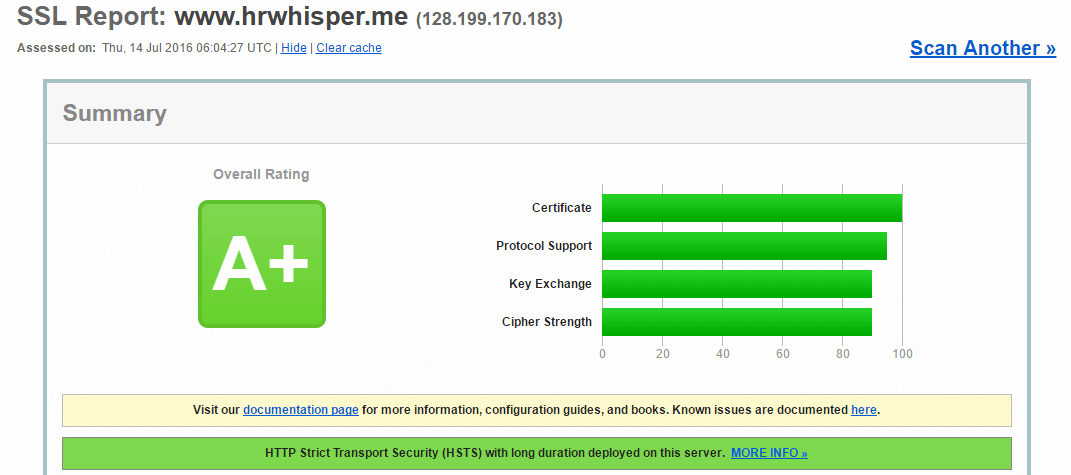
设置ssl协议为 TLSv1 TLSv1.1 TLSv1.2 , (不要SSL3 SSL2),这样兼容了绝大部分的机器,并更安全。此外,设置了ssl_ciphers,开启了HSTS。
剩下的其实就是普通站点原来的default.conf复制过来的。
在 SSL安全性 评分中(https://www.ssllabs.com/ssltest/ ),达到最高的等级A+
lnmp-https-score
下面是完整的配置文件:
1
2
3
4
5
6
7
8
9
10
11
12
13
14
15
16
17
18
19
20
21
22
23
24
25
26
27
28
29
30
31
32
33
34
35
36
37
38
39
40
41
42
43
44
45
46
47
48
49
50
51
52
53
54
55
56
57
58
59
60
61
62
63
64
65
66
67
68
69
70
71
72
73
74
75
76
77
78
79
# # The default server # server { listen 443; listen [::]:443 ssl ipv6only=on; server_name hrwhisper.me; ssl on; ssl_certificate /etc/ssl/private/1_www.hrwhisper.me_bundle.crt; ssl_certificate_key /etc/ssl/private/2_www.hrwhisper.me.key; # ssl_session_timeout 5m; ssl_protocols TLSv1 TLSv1.1 TLSv1.2; ssl_ciphers ECDHE-RSA-AES128-GCM-SHA256:ECDHE-ECDSA-AES128-GCM-SHA256:ECDHE-RSA-AES256-GCM-SHA384:ECDHE-ECDSA-AES256-GCM-SHA384:ECDHE-RSA-AES128-SHA256:ECDHE-ECDSA-AES128-SHA256:ECDHE-RSA-AES128-SHA:ECDHE-ECDSA-AES128-SHA:ECDHE-RSA-AES256-SHA384:ECDHE-ECDSA-AES256-SHA384:ECDHE-RSA-AES256-SHA:ECDHE-ECDSA-AES256-SHA:!aNULL:!eNULL:!LOW:!3DES:!MD5:!EXP:!PSK:!SRP:!DSS; ssl_prefer_server_ciphers on; #enable HSTS including subdomains add_header Strict-Transport-Security "max-age=31536000; includeSubdomains"; charset utf-8; access_log /var/log/nginx/access.log main; # Load configuration files for the default server block. include /etc/nginx/default.d/*.conf; location / { root /var/www/html; index index.php index.html index.htm; if (-f $request_filename/index.html){ rewrite (.*) $1/index.html break; } if (-f $request_filename/index.php){ rewrite (.*) $1/index.php; } if (!-f $request_filename){ rewrite (.*) /index.php; } } error_page 404 /404.html; location = /404.html { root /usr/share/nginx/html; } # redirect server error pages to the static page /50x.html # error_page 500 502 503 504 /50x.html; location = /50x.html { root /usr/share/nginx/html; } # proxy the PHP scripts to Apache listening on 127.0.0.1:80 # #location ~ \.php$ { # proxy_pass http://127.0.0.1; #} # pass the PHP scripts to FastCGI server listening on 127.0.0.1:9000 # location ~ \.php$ { root /var/www/html; fastcgi_pass 127.0.0.1:9000; fastcgi_index index.php; fastcgi_param SCRIPT_FILENAME $document_root$fastcgi_script_name; include fastcgi_params; } # deny access to .htaccess files, if Apache's document root # concurs with nginx's one # #location ~ /\.ht { # deny all; #} }
参考资料