前言:
当数据量大的时候,一台机器可能不足以满足性能的需求,如存储空间、内存不足,而垂直扩展十分昂贵,故用分片进行水平扩展是一个很好的解决方法。
本文介绍了mongodb 进行分片的方法和步骤
mongodb分片 结构

主要由下面的三部分组成
Shard:
- 可以使mongod也可以是几台机器组个一个replica set,防止主机单点故障
Config Server:
- 存储整个集群的配置信息,如 chunk 大小。
Query Routers:
- mongos实例,是客户端的入口。让整个集群看上去像单一数据库,前端应用可以透明使用。
配置步骤
1.启动所有的配置服务器config server
语法:
1 | mongod --configsvr --replSet configReplSet --port <port> --dbpath <path> |
例如:
1 | mongod --configsvr --dbpath e:\mongodb\config\ --port 27019 |
或者用配置文件 https://docs.mongodb.org/manual/reference/configuration-options/
2.启动Mongos实例
语法(下面两种均可)
1 | mongos --configdb configReplSet/<cfgsvr1:port1>,<cfgsvr2:port2>,<cfgsvr3:port3> |
例如:
1 | mongos --configdb hrwhisper.mongo.shards1:27019,hrwhisper.mongo.shards2:27020,hrwhisper.mongo.shards3:27021 |
注意:
使用localhost和远程地址混用会报错,我是修改host文件:
- 127.0.0.1 hrwhisper.mongo.shards1
- 127.0.0.1 hrwhisper.mongo.shards2
- 127.0.0.1 hrwhisper.mongo.shards3
mongos实例默认运行在27017端口
貌似3.2需要3个config server
3.启动shard
可以用普通的mongod
1 | mongod --dbpath e:\mongodb\twitter\ --port 27030 |
4.添加分片进mongos
1.用mongo 连接上mongos(直接输入mongo既可以连上,如果你修改了mongos端口,则mongo --port
1 | mongo --host <hostname of machine running mongos> --port <port mongos listens on> |
- 使用sh.addShard() 添加shard to cluster (每个shard都要进行一次)
添加 复制集名为rs1运行在mongodb0.example.net :27017
- sh.addShard( "rs1/mongodb0.example.net:27017" )
添加单一的 mongod
- sh.addShard( "mongodb0.example.net:27017" )
例如:
1 | sh.addShard("hrwhisper.mongo.201.1:27030" ) |
注:
- 需要一些时间将块迁移到新的shard
- 可以使用 database command 来设置名称和shards最大的大小
5.对database启用分片
先用mongo shell 连接到mongos 实例,
使用sh.enableSharding() 指定要开启分片的数据库或者db.runCommand()
1 | sh.enableSharding("<database>") |
例如:
1 | sh.enableSharding("twitter") |
一旦enable了个数据库,mongos将会把数据库里的不同数据集放在不同的分片上。只有数据集也被分片,否则一个数据集的所有数据将放在一个分片上。
6.对collection启用分片
使用 sh.shardCollection() 对集合进行分片
- sh.shardCollection("
. ", shard-key-pattern)
例如:
1 | 通过zipcode分片,如果zipcode值一样,则用name |
注:需要先建立对应的索引
1 | db.stream.createIndex( { _id: "hashed" } ) |
其他
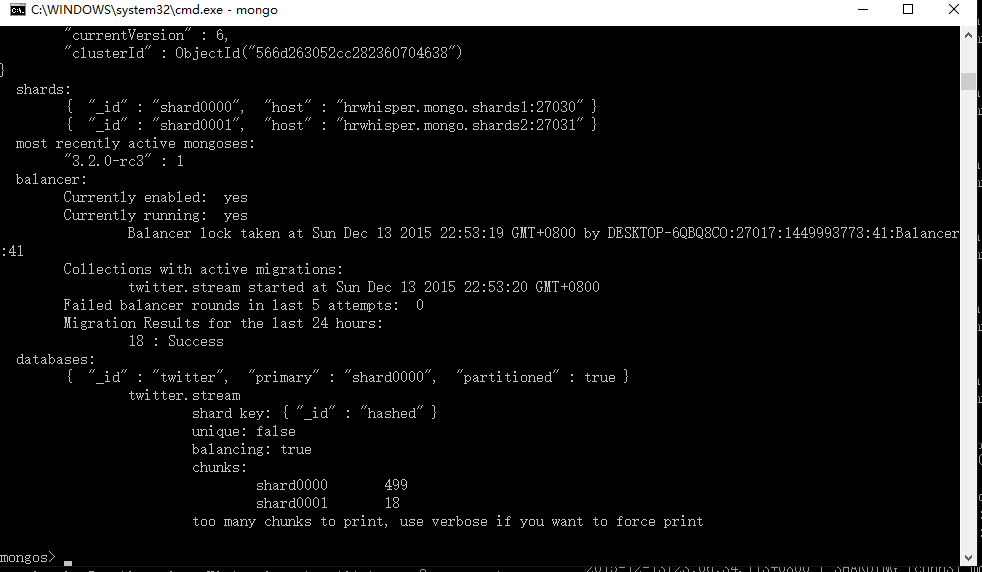
查看分片状态
用mongo 连接上mongos, 然后通过Mongo命令行输入:sh.status()
移除分片
需要切换到admin collection,然后再执行移除分片的代码:
1 | db.runCommand( { removeShard: "<shardname>" } ) |
再次查看状态:

分片实战
修改hosts文件:
- 127.0.0.1 hrwhisper.mongo.shards1
- 127.0.0.1 hrwhisper.mongo.shards2
- 127.0.0.1 hrwhisper.mongo.shards3
1 | mongod --configsvr --dbpath e:\mongodb\config\ --port 27019 |